Friday, February 25, 2011

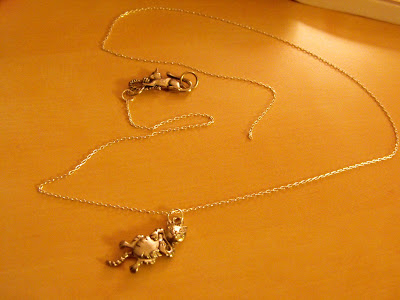
Kimberly's Simple Cat Charm Necklace

Here are the directions for a simple charm and chain necklace I made for my fantastic sister.

Materials
  •  Silver chain.  I like my necklaces pretty long, but usually necklaces are either about 18" long or 22" long.  The length of the chain for this necklace is about 24 inches.  Michael's Arts and Crafts sells really inexpensive jewelry making supplies, like their small cable chains.  You will need jewelry metal clippers (I am not sure of the technical term, sorry) to cut the desired length.
  • One cat charm (this one has moving parts--the head moves a bit)
  • One clasp.  For this necklace, I found an awesome cat "s" clasp.

  •  Three 6mm round jump rings
The split in the center allows you to use the jump ring to attach and connect items
  • You will also need some needle nose pliers and clippers for cutting the chain.
  • *Note on Materials* Make sure all metal materials are made from the same metal (i.e. gold, gold fill, silver plating, pewter, etc...also, gold plated fixings are not as expensive as one would expect, Michael's arts and crafts prices them at the same price of silver, although the selection is not as expansive).  This ensures that is the necklace ages and if it tarnishes the color will be consistent throughout the piece.
Note how all of the materials match.

Steps:

1.  Cut chain to length desired

2.  Fix one jump ring to charm by....
    Bend open jump ring enough to allow charm to slide on to ring with pliers.  Be careful not to open it too wide or else the ring might become a little crooked
    Now, carefully close the jump ring in the same manner as you opened the jump ring.
    Here is what the charm should look like once you have affixed the jump ring properly.
  3.  Now you will attach one jump ring to the chain.  Follow the directions given in the picture captions below. (I used a finer chain, so if your jump ring can fit into the last link, you can skip this how to widen the link to affix the jump ring to the smaller chain...go down to the step where you affix the chain to the cat clasp using the jump ring)

Gently use the needle nose pliers, put enough pressure on the handles to round out the link so the jump ring can be used.
This is what it should look like once you have rounded the link (and before the jump ring)
Open one of the jump rings in the same manner mentioned above, and slide it into the newly rounded link.  Do not close it yet, as the clasp needs to be added. 
Once you slide the ring that is already affixed to the clasp, bend the jump ring closed. 
4.  At this point, only one end should be attached to the clasp.  Now, slide the cat charm via the jump ring onto the chain by the end that does not have a jump ring attached.


5.  Now, round out the last link on the other end of the chain (make sure the chain is not twisted), attach jump ring, affix to clasp. Voila! You are done!

The necklace in its entirety.  It's simple, yet unique.

A close up of the necklace.  An easy was to give a necklace as a gift and to prevent tangles is to cut into an index card and tape the chain to the back.

Wednesday, February 16, 2011

Cabled Headband notes

Recently I completed the "Cabled Headband" from the awesome One Skein Wonders by Judith Durant.  For someone that does not have that much experience with cables, I was a little lost in how the pattern should progress.


Here are my notes on this project:
  •  Here is what it looked like once all of the increases are through.  As the picture below shows, I had a lot of trouble with provisional method cast on.  I would have preferred a better introduction for this pattern when it comes to the transition between provisional cast on and starting the pattern as written.  I recommend that you add a row between casting on and starting row one.  I basically copied Row 1 by knitting the first three, then continuing the rest of Row 1 as written, and then continuing the rows as the pattern states, starting at Row 1 again.


  • Be sure to keep track of all of the eight rows in the cable pattern to make the pattern look uniform.

  • The cable pattern in this pattern is quite easy, and is great for a beginner as it isn't a difficult cable pattern.  It's the only type of cable in this project, which makes it easy to memorize.  During the increases every two inches, be sure to keep track of the number of stitches between the first three slipped stitches and the middle cable stitches.

This is the point where the first three stitches in the middle are slipped onto the cable needle

The three stitches held to the front, and the next three stitches are knitted.

Then, the three stitches on the cable needle are knitted.
  • During the increases and decrease the occur intermittently through the pattern (see pattern), the average number of rows between these increases and decrease is about thirteen, depending on the thickness of your yarn.
  • I counted sixteen repeats of the cable cross pattern.
  • When I reached the end of the pattern, I did the first two rows of the cable cross pattern, and joined the live stitches that I cast on provisionally (after I removed the craft yarn) with the end of the pattern, creating a continuous cross pattern using the three needle bind off, as recommended in the pattern.

Here is my finished headband:


Because I have a very large head, I decided to stretch out the headband by placing a weight in the widest part of the headband.  I let it sit overnight, and now the headband fits me perfectly.

Tuesday, February 15, 2011

Awesome Cat Toy that will make your cat very happy (well, high on catnip)

Cats love catnip.  Unfortunately, catnip itself is messy so it's best to put it in toys (also, sprinkling it on cat furniture is a really good idea)

Here is a simple catnip toy that will put your kitties in a catnip heaven:

Materials needed:
  • Some scrap fabric that will be able to withstand a cat biting into it--about 8 1/2 inches long and 4 1/2 inches wide, depending on the size of your cat (which I will explain below). 
I used a high-quality quilting fabric scrap and it holds up well as a cat toy.
  • Pre-washing the fabric is a good idea as it isn't a sound idea to throw a catnip toy in the washing machine.
  • Catnip.  The cat treat will be completely filled with catnip, and as the size depends on the size of your cat, you will need to adjust accordingly.  I purchased a 1 oz. container of catnip from Petco, but often small, local pet stores will carry stronger types of catnip, but they tend to be more expensive.
  • Accoutrements for sewing: sewing thread, scissors, sewing machine, and an iron for pressing the fabric.
  • A piece of paper
Measuring:
  • Before cutting the fabric, be sure to press any wrinkles out of the fabric.
Iron out any wrinkles now!
  • I designed this cat toy to mirror the length of the cat's belly.  Beshaba's belly is about 8 inches long...plus a 1/4 inch seam allowance per seam, this will be 8 1/2 inches

Sorry, my cat was not cooperating, so you will have to take my word for it.

  • Usually, my cats roll on whatever happens to contain catnip (or hug), so I thought it would be nice to have a toy that runs of the length of their belly.  Therefore, you should measure the length between their front legs and their back legs.  My cat is quite small, so it is only eight and 1/4 inches, so I am allowing for a 1/4 inch seam allowance for the legnth portion of the fabric.
8 1/2 inches long.  If you wanted to be super-precise, you could use a rotary knife on a cutting board, but using scissors is ok for the task at hand

  • For the width of the fabric, cut 4 1/2 inches.  This will be folded in half.  For bigger cats, I would add 1-3 more inches, depending on the size of your cat
Fold the piece of fabric in half lengthwise.  There is no need to iron this--you're done with ironing at this point

Assembly:
  • Sew the seams together (see picture, below).  Leave one of the width seams open.
Allow for a 1/4 inch seam allowance. 

Turn the corner without breaking the thread.  Be sure to allow the proper seam allowance.
  •  Now, because this is a cat toy, sew over the seams again for added strength against splitting seams.
When going over the seam for added strength, try to stay within the seam allowance
This is where the catnip will go in a bit.  No need to iron any seams

  • Turn inside out
Like this
  • Use a pen to make sure the corners are turned all of the way out
  •  Once you are at this point, add the catnip.  I used a piece of paper to funnel the catnip into the fabric tube.
While adding the catnip, my cat decided to investigate

Fill almost to the top, leaving room to close the seam

  • Fold seam over on itself.  The ideal consistency for this toy would be to pack down the catnip.  This will give the cats a better toy to play with.  
This is what it should look like at this point

  •  As before, the seam will need to be reinforced.  I ended up sewing the seam several times over for strength.
My seam ended up being about 1/8 of an inch, and since it was reinforced with multiple seams, the seam allowance shouldn't be a problem.

Voila! You are done! woo! A simple, easy, affordable cat toy that your cats will love to fight over, like mine do.  I tried a variety of sizes and consistency of catnip, and my cats really like this too.  It is a good idea to put this toy after awhile so the cats will stay interested in it when it is within their grasps.


 Here is a "product test" by my two cats

I threw the toy on the floor for Beshaba to play with, and she started to sniff and bat at it as cats normally do...

Unfortunately for Beshaba, Sadie, my 16 lb. half Maine-Coon, decided it was her toy now.

As you can see (somewhat, she was moving so fast) she is able to hug the toy while biting the toy. This enables her to have an awesome cat time.

Since this toy was made for a significantly smaller cat, I would recommend for larger cats a larger piece of fabric.

 Have fun and enjoy! Thanks for reading my blog.  Any comments would be much appreciated.

Wednesday, February 9, 2011

Hello!

I decided to start a craft blog as I have so many projects going and I would like to share my projects.  I have several projects that I am working on right now that I will take some pictures of and describe how I make such things.

Here are a few things that I am in the process of working on:
1. Antique costume jewelry repair/redesign
2. Red and White quilt
3. Cabled Headband